Mira User Guide
Learn how to set up your Mira and sync it with the iOS or Android app. You’ll soon be on your way to making healthier choices every day!
Setting up your Mira tracker
Here’s what you need to get started: Your Mira tracking device, your charger and your iPhone® or compatible Apple® device. Your Mira tracker will be clipped into the bracelet when you receive it. You can either pop it out or leave it in the bracelet for setup. See instructions for clipping the tracker in and out of the bracelet. Mira compatibility:
- Mira is compatible with and optimized for iPhone 4S and above
- Mira is compatible with, but not optimized for iPad miniTM, iPad® (3rd Generation and above) and iPod Touch® (5th Generation and above)
- Mira is compatible with iOS 7 and above
- Mira is compatible with and optimized for Android phones running Android 4.4 and above
- Mira is compatible with but not optimized for Android tablets running Android 4.4 and above
Charging your tracker
- Plug the charger into a USB port. You can use the USB port in your computer or you can use a standard USB wall adapter (like the one that came with your iPhone).
- When the tracker says “Mira,” you know it’s awake, but leave it on the charger for now.
- On the tracker screen, you will see an animated battery icon letting you know that your tracker is charging. Once your tracker is fully charged, you will see a full battery icon on the tracker screen. That icon will remain on the screen until you remove the tracker from the charger.
Setting up your Mira app
- From your iPhone, download the free Mira app from the Apple App Store
- Open up the app and follow the onscreen guide to set up your profile. Once you’ve completed this step, you’re ready to go inside the app.
Pairing your tracker and your app
- Make sure your phone’s Bluetooth is turned on.
- After downloading the Mira app, open it on your phone.
- Using your phone, complete the onboarding questions to set up your Mira profile. This step is important because it helps Mira get to know you better.
- It is now time to pair your device.
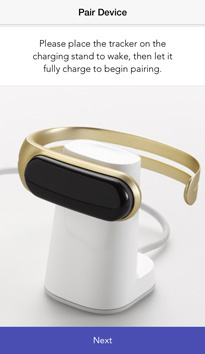
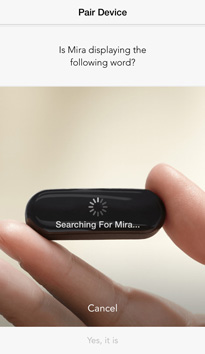
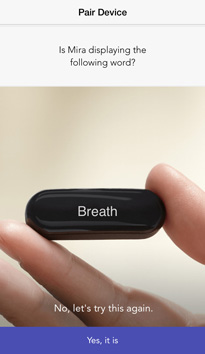
STEP 1: The app will prompt you to place the tracker on the charger (if it’s already on it, skip this step). STEP 2: The Mira app will search for nearby Mira trackers. When the app finds the tracker, they will both display the same word. STEP 3: The app will ask you if your tracker is displaying that same word that you see on your screen. If both words match, tap: Yes, it does. If they do not match or the tracker is not showing a word, tap: No, let’s try this again. STEP 4: You are now paired! After pairing, a quick tutorial on the Mira app pops up. If you skip it or need to go back to it at any time, you can find it by tapping the menu icon in the upper left corner of the app and choosing: Tutorial. Once paired, the app displays your Day view (or Home screen) and you’ll know that you’re ready to go. Making the most of Mira This is where the fun starts! Mira is a champ when it comes to counting steps, but there’s so much more you can do. Keep reading to get an in-depth look inside the Mira app, or skip ahead and learn more about the Mira tracker.
Inside the app
Main menu From the main menu, you can:
- See how long you have been using Mira.
- Check out how many steps you’ve taken this year.
- Access your Home screen.
- View your favorite Boosts.
- Access your Profile.
- Update your Settings.
- Revisit the Mira Tutorial.
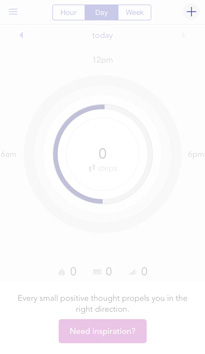
Viewing your progress Seeing how far you have come will keep you inspired, so check in often! There are three different ways you can view your progress. At the top of your Day view screen, tap: Hour, Day or Week.
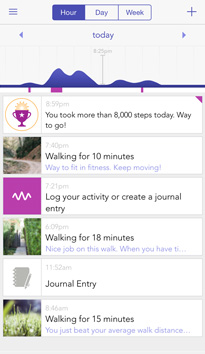
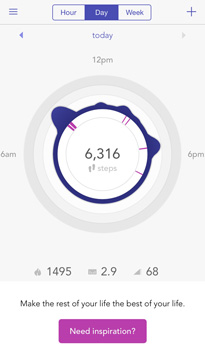
- HOUR: For a detailed look at your day, check the Hour view. You’ll find an in-depth summary of any activities Mira detected (Activity Cards, Boosts, Journal Entries, Milestones and more).
- DAY: The Day view is Mira’s Home screen. It features a graph that represents your activity for the day. The graph in the center of the screen displays your preferred metric. (You chose one of the metrics below when setting up your profile and it can be changed by going to the Main Menu and selecting: Profile.)
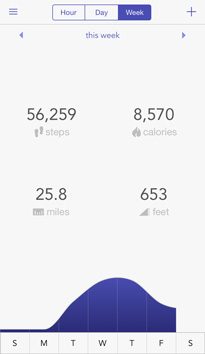
- WEEK: Tap: Week to see your metrics for your whole week. The graph at the bottom of the screen shows your info at-a-glance.
The concentric circles pulsate when your app is syncing with your tracker; you’ll see the word: Syncing on the screen. You can keep using Mira while the tracker and app are syncing. TIP: From the Day or Hour screen, you can swipe to go back and see how you did on a previous day. Swiping on the Week screen displays data for the previous week. TIP: Your Day view also includes inspiring messages at the bottom of your screen–don’t miss them! Activities Mira is always tracking your steps, walks and runs. Once you’ve been walking for a minimum of six minutes or running for three minutes, Mira generates an Activity Card. Activity Cards provide great information! On every card, you’ll see:
- The number of steps you took.
- How many calories you burned.
- The distance you traveled.
- The elevation you reached.
- Your step pace for the completed activity.
Insights In addition to metrics, you’ll find an Insight on every Activity Card. Mira’s Insights provide helpful and encouraging feedback on your activities. Insights are indicated by a quote icon and located directly under your activity metrics. TIP: Did you know you’re always burning calories? That’s why Activity Cards display active calories (the calories you burned from walking, running, etc.) and total calories (your baseline burn plus active calories). Manual activity cards You can manually add an Activity Card when you complete non-step activities like yoga, cycling or weightlifting:

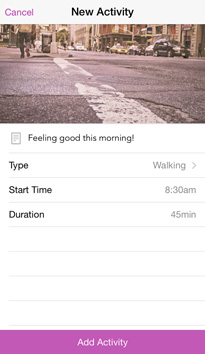
STEP 1: Tap on the + in the upper right corner of your app. STEP 2: Select: Activity. STEP 3: Enter Activity Type, Start Time and Duration. Tap the photo at the top of the activity page to add your own photo and personalize your experience. Tap: Add Activity. STEP 4: You’re all set! Boosts The last section of your Activity Card contains a Boost. Boosts provide motivating tips to help you make the most of your future fit moments. Boosts are selected based on the activities Mira detects that you enjoy doing, so if you see a Boost you like, be sure to tap the star icon to favorite it. Using boosts In addition to Boosts on Activity Cards, Mira has Inspiration Boosts, healthy activities you can do right now to get your step count up, burn extra calories and keep moving. Here’s how to use Inspiration Boosts:
- From the Hour and the Day view in your app, tap the magenta: Need Inspiration? button at the bottom of your screen.
- If you do the suggested activity, tap: I did this! The Boost will be added to your day at the time you take action. In your Day view, you will see a magenta line at the time of day you completed the Boost. In the Hour view, you will see the word: Boost. Tap it to review the Boost you completed.
- If you don’t love the Boost suggestion, use the arrow at the bottom of the screen to get another idea–don’t worry, there are tons of them!
Love a Boost? To make sure you can easily repeat a Boost, when you see one you like, tap the star icon in the upper right corner of the screen to save it as a favorite. To access your favorite Boosts anytime:
- Tap the menu icon in the upper left corner of the app.
- Tap: My Boosts.
- Tap the one you want to complete and then tap: I did this! The Boost will be added to your day.
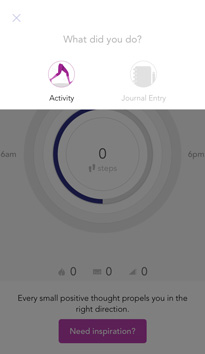
Celebrating milestones Mira is with you every step of the way, and rewards your achievements with Milestone trophy cards. Be sure to open these cards. We don’t want to ruin the surprise, but there may be fireworks involved. Reflective Insights Even when you’re not in motion long enough for Mira to create an Activity Card, Mira still knows you’re moving! Reflective Insights give an overall summary of your progress for the day, week or month. Journal Entries The Mira journal allows you to track even more. You can use the space to write about how you felt while doing an activity, journal your food choices, upload inspiring photos or capture anything else. The space is yours! To add a Journal Entry:
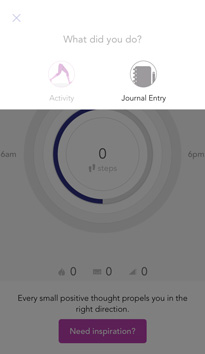
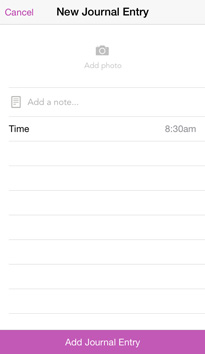
STEP 1: From the Hour, Day or Week view, tap: + in the upper right corner of your screen. STEP 2: When asked if you want to add an Activity or Journal Entry, tap: Journal Entry. STEP 3: Add your note, take a new photo or upload one from your photo library, note the time and tap: Add Journal Entry. STEP 4: Journal Entry added! TIP: To access past entries, go to the Hour view and scroll through your days. Adding and replacing photos Personalize your Mira experience by adding your own photo to an Activity Card or Journal Entry. For journal entries:
- Go to the Hour view.
- Tap the Journal Entry you want to edit.
- Tap: Add Photo at the top of your screen.
- Use the pop-up menu to take a new photo or tap: Camera Roll to upload a photo from your phone.
- When prompted, allow Mira to access your photos (you will only have to do this once).
- When you’re all set, tap: Add Journal Entry.
For activities
- Go to the Hour view.
- Tap the Activity Card you want to edit.
- Tap the existing photo at the top of your screen.
- Use the pop-up menu to take a new photo or tap: Camera Roll to upload a photo from your phone.
- When prompted, allow Mira to access your photos (you will only have to do this once).
- When you’re all set, tap: Add Activity.
Changing your profile and settings Change can be good! Here’s how to update your profile with new information, including changes in your weight, preferred metric, email address and more:
- Tap the menu icon in the upper left corner of the app to go to your Settings.
- Tap: My Profile.
- You can change your first name, last name, email address, gender, date of birth, height, weight, preferred metric, time of most energy spent, available time and how much effort it is for you to run a mile, do 10 push-ups or touch your toes.
From time to time you might want to access your Settings. Here’s how:
- Tap the menu icon in the upper left corner of the app.
- Tap: Settings.
- From Settings you can: Change from miles and pounds to kilometers and kilograms, check your tracker’s battery level, see what version of the app you have, unpair your tracker from the app and access information like FAQs and the Privacy Policy.
Goal Setting You can set your daily step goal in the iOS version of the app. Your Mira opal will buzz and send you a celebratory message when you’ve hit your goal. You can adjust your step goal at any time. Coming soon to Android. STEP 1: Tap the menu icon in the upper left corner of your Mira app. STEP 2: Go to My Profile. STEP 3: Tap the step count listed under Daily Goal to set a new goal number.
Your tracker
After charging your tracker and pairing with the app, you’re ready to use your Mira. Mira will automatically detect step activities like walks, jogs, runs, hikes and trips up the stairs. Find tutorial videos on how to remove the tracker, display stats, charge your Mira and other useful information on Mira’s youtube channel. Wearing Mira It’s very important that you place the tracker in the bracelet the right way to prevent it from getting stuck or falling out. Identify the clip on the bottom of the tracker and follow the instructions below or watch this video.
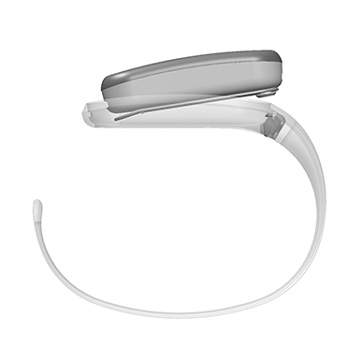
STEP 1: Tilt the open end of the clip (the end without the metal button) into the bracelet, fitting it over the ridge in the bracelet. STEP 2: Press the other end of the clip into the bracelet. You should feel a light snap and hear a click when Mira is in place. STEP 3: To remove the tracker from the bracelet, turn the bracelet over and pull the small tab towards the tracker. You can wear Mira clipped to your shirt, bra, tank top or waistband when you want to be more discreet. To secure tracker to clothing, simply line up the edge of the clip with the fabric and slide on. Do NOT pull or rotate clip. The clip will adjust to fit. TIP: The Mira bracelet is pliable, so you can adjust it to your wrist for the perfect fit. It will hold up to standard wear and tear. For best results, treat it like your other favorite everyday jewelry. Viewing progress on your tracker Because Mira is so awesome at tracking your activity, you can view lots of data without even opening up the app–this makes it easy to check in while you’re on the go. When you set up your app, you picked a preferred metric–steps, calories, distance or elevation–you can always change this by opening up the app and going into your profile. Use your tracker to view your progress of your preferred metric. Here’s how:
- Lightly pinch the sides of the tracker for up to three seconds–you can do this while it is in the bracelet.
- Your primary metric will display.
- When you release your pinch, the time will display for five seconds.
You can also view your secondary metrics on your tracker. Here’s how:
- Lightly pinch the sides of the tracker for up to three seconds–you can do this while it is in the bracelet.
- Your primary metric will display.
- The time will display for five seconds.
- Keep pinching and the tracker will cycle through all of the metrics, showing each one for one second, for as long as you continue pinching.
- When you release your pinch, the last metric displayed will continue to display for three seconds and then turn off.
TIP: To change the orientation of your tracker’s display, go to the Main Menu in your app and tap: Settings. Look for “Display Orientation” under the Device section and tap: Normal. Your battery To count your steps and keep on tracking, your Mira’s battery needs to be charged. Your tracker will keep its charge for up to five days depending on usage. It’s best to charge your Mira device when the battery gets lower than 20%. To make sure your Mira is ready when you are, charge it every night when you go to bed. To check the battery level on your tracker:
- Select: Settings from the Main Menu in the upper left hand corner of the screen.
- Go to Battery Level to see the percentage of power remaining. Please note that if your tracker is not within a reasonable distance of your phone, or if the tracker battery is dead, the value will show n/a.
Memory and storage If your tracker and your phone get separated for a few days, don’t worry! Your data is safe. Depending on your activity level, your tracker will store all of the data it collects–steps, calories, distance ran, elevation and Activity Cards–for up to 30 days. Resetting your tracker It will not be necessary to reset your tracker often. Resetting your Mira will delete any data that has not been synced, so you may lose some data. Here’s how to reset your tracker:
- Place the tracker on the charger.
- Pinch lightly on the top and bottom edges of the black display, and keep holding that pinch for the next two steps.
- After five seconds, the tracker will show a message that says: Reset in 5… 4… 3… 2… 1.
- After the countdown the device will display: Mira. You should be reset and ready to try again.
Caring for your Mira
- Mira is water resistant but we advise not wearing it in the shower, sauna, and steam room or during hot yoga or swimming.
- Some harsh chemicals in spray sunscreens and bug repellant can damage your Mira tracker. Do not put spray sunscreens, bug repellant, or nail polish remover on the tracker. If you accidentally get these chemicals on the tracker, wipe with a soft, damp cloth. Do not wash by submerging in water. The bracelet without the tracker is made of surgical-grade steel and can withstand washing with soap and water.
- The small charging contacts on the underside of your tracker can be cleaned if necessary using a dab of rubbing alcohol on a cotton swab.
Troubleshooting if your Mira is not charging
- Sometimes sweat or other moisture can cause oxidation on the charging contacts. We recommend cleaning the contacts on the back of tracker and charger pins with rubbing alcohol on a cotton swab, or with a slightly damp cloth. Place your Mira back on the charger. You will know it’s charging when the battery icon lights up.
- If your Mira is on the charger but not properly “locked” in, it won’t charge. The circles on the charger must line up with the pins on the underside of your tracker. Adjust your tracker on the charger until you see the screen light up and the battery icon appear. The screen will light up initially but won’t stay lit even though it continues charging.
Apple, App Store, iPhone, iPad, iPad mini and iPod touch are trademarks of Apple Inc. OS is a trademark or registered trademark of Cisco in the U.S. and is used under license.
FCC STATEMENTThis device complies with part 15 of the FCC Rules. Operation is subject to the following two conditions: (1) This device may not cause harmful interference, and (2) this device must accept any interference received, including interference that may cause undesired operation. FCC CAUTION Changes or modifications not expressly approved by the party responsible for compliance could void the user’s authority to operate the equipment. NOTE: This equipment has been tested and found to comply with the limits for a Class B digital device, pursuant to part 15 of the FCC Rules. These limits are designed to provide reasonable protection against harmful interference in a residential installation. This equipment generates, uses and can radiate radio frequency energy and, if not installed and used in accordance with the instructions, may cause harmful interference to radio communications. However, there is no guarantee that interference will not occur in a particular installation. If this equipment does cause harmful interference to radio or television reception, which can be determined by turning the equipment off and on, the user is encouraged to try to correct the interference by one or more of the following measures:
- Increase the separation between the equipment and receiver.
- Connect the equipment into an outlet on a circuit different from that to which the receiver is connected.
- Consult the dealer or an experienced radio/TV technician for help.
SAFETY STATEMENT Read these instructions. Keep these instructions. Heed all warnings. Follow all instructions. Please note: All safety instructions and cautions apply to the Mira tracker and/or its accessories and components. Do not attempt to open the Mira tracker. Substances contained in this product and/or its battery may damage the environment and/or human health if handled and disposed of improperly.
- Do not tamper with the Mira tracker and/or its accessories and components.
- Do not use abrasive cleaners to clean the Mira tracker and/or its accessories and components.
- Do not place the Mira tracker and/or its accessories and components in a dishwasher, washing machine or dryer.
- Do not expose the Mira tracker and/or its accessories and components to extremely high or low temperatures.
- Do not use the Mira tracker and/or its accessories and components in a sauna or steam room.
- Do not leave the Mira tracker and/or its accessories and components in direct sunlight for an extended period of time.
- Do not leave the Mira tracker and/or its accessories and components near open flames.
- Do not dispose of the Mira tracker and/or its accessories and components in a fire. The battery could explode.
- Do not attempt to disassemble the Mira tracker and/or its accessories and components; it does not contain serviceable components.
- Never allow children to play with the Mira tracker and/or its accessories and components; the small pieces may be a choking hazard!
Built-in Battery Precautions
- Do not attempt to replace the battery in your Mira tracker–it is built in and not changeable.
- Charge the battery in accordance with the instructions supplied with this guide.
- Use only the charger that shipped with the Mira tracker to charge your battery.
- Do not attempt to force open the built-in battery.
Disposal and Recycling Information The symbol on the product or its packaging signifies that this product has to be disposed separately from ordinary household wastes at its end of life. Please kindly be aware that this is your responsibility to dispose electronic equipment at recycling centers so as to help conserve natural resources. For information about your recycling drop off point, please contact your local related electrical and electronic equipment waste management authority or the retailer where you bought the product. Do not dispose of the Mira tracker and/or its accessories and components with household waste. Batteries are not to be disposed of in municipal waste stream and require separate collection. Disposal of the packaging and the Mira tracker and/or its accessories and components should be done in accordance with local regulations. Please recycle! CAUTION: Consult your doctor before beginning or modifying any exercise program. CAUTION: Consult your doctor before use if you have any preexisting conditions that might be affected by your use of this product. CAUTION: Do not check call notifications or other data on the product’s display while driving or in other situations where distractions could be hazardous. CAUTION: This product is not a toy. Do not allow children or pets to play with this product. This product contains small components that can be a choking hazard.